 |
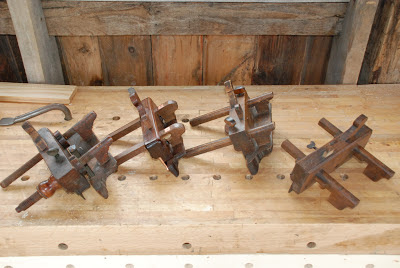
| Four of the plows in my collection |
The wooden plow plane is truly the workhorse joinery plane of the hand tool or hybrid shop. It cuts grooves for a panel door faster than you can set up a router table. It can be used to cut rabbets by burying the iron in the plane fence, rather like setting up a sacrificial fence on a table saw. It can be used to mark out, and even begin, a long and accurate rip saw cut, whether you make the cut by hand or band saw. Even if you aren’t committed to working entirely by hand, a vintage wooden plow can be a great fit for your shop and a complement to your power tools. Here's how to make sure you buy a good one.
Skating By
 |
| Square along the wide side |
The first, and most difficult to correct, thing to check is the skates. Like an NHL defenseman, a plow needs a good pair of skates. These are the strips of metal that protrude out of the bottom of the plane. They are usually two to three inches tall and sometimes feature brass trim. Like an ice skate, this is the bearing surface of the plane, meaning that this is what actually touches the wood. It is vital to the operation of the plane that these two skates are straight and lined up with each other. Over the years, the wood in the plane body moves with the seasons and can cause these skates to go out of alignment, sometimes quite severely. Check this with a straightedge before you buy the plane. The skates should be aligned, both along the wide side of the skate and the bottom. They should also be at a right angle to the bottom of the wooden plane body. If they fail these tests, leave this one be and hunt for another plow.
 |
| Square along the bottom |
However, if it is just the bottom edges of the skates that aren't lined up, and you aren't working on a historic plow with real value, you can file the bottoms until they line up. Work slowly and carefully until the edges line up with each other and are parallel to the bottom of the wooden body of the plow. This will be easier if you remove the fence from the body and hold the body in your preferred vise.
On the Fence
After you are sure your skates are square and true, the next step is to make sure that the fence is as well. Depending on the age and national origin of the plow, you will either have a threaded screw arm system, a wedge-arm system or a “Yankee system”, in which the arms slide through the body and are held in place with wooden thumb screws that thread in from the top of the body. There are other, more exotic, methods but you are unlikely to find them on a plow that you should be using. All lock systems can be made to work well, but my personal favorite is the wedge-arm plow (see my personal plow), as these are easy to change settings and don’t require tedious turning of
sometimes-sticky wooden threaded nuts.
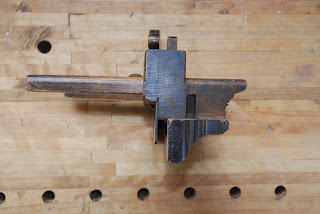 |
| This fence is square enough |
To check the fence, set the face of the fence close, about ½” or so, to the skate. You should be able to “eye-ball” the gap between the skate and the fence and determine if they are parallel along the vertical axis. The horizontal axis doesn't matter, as this is adjusted when setting up the plane to cut. In my years of working with wooden plows, I've only had one where this was an issue, but if yours is out of parallel, you will have to shim the arms where they attach to the fence. This is touchy, sensitive work that isn't possible on some types of plows, so finding another plow is usually a better alternative.

Once you've confirmed that the fence is square, you need to check the depth stop hardware. Make sure it is complete and turns, even if it turns with some difficulty. This is usually grimy and stuck up with old grease and detritus that works its way into the thread mechanism.
Never, for any reason, remove metal wood screws from wooden planes. You will only cause damage to the screw heads, potentially snapping them off. Rather than take the stop apart from the top, you can take the depth stop out of the bottom of the plane by turning the adjustment knob all the way out. Sometimes these will be quite stuck, again by the detritus and grease. You may have to slightly rock the stop body, front to back, to get it to pull out. Once you have it out, polish the brass body to remove the old dirt and wax it with paraffin so that it operates smoothly in the stop mortise. Put a drop or two of lightweight machine oil into the threaded hole, put the stop back into its mortise, and turn the thumbscrew to reengage the threaded adjuster rod.
The heart of the matter: the iron and wedge
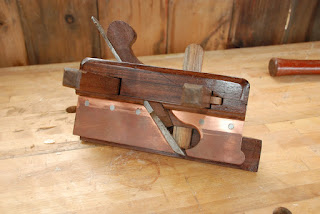 |
| If you can't find one, make one |
Assuming the plow passed all the checks, or you feel confident that you can make the repairs, bring it home and start to address the iron and wedge. Originally, these plows came with a set of 8 irons, starting at 1/8” and going up to 5/8”. These irons are usually long gone, which is a shame. Because of the wedging action necessary to keep the iron set properly, the bedding angle, wedge angle and iron angle all have to fit together very precisely. Therefore, it can be difficult to make a plow work if you are missing the proper irons. The best thing to do, should you find yourself in this situation, is to make a new wedge that will work with replacement plow irons, which can be obtained from vintage tool dealers and, very frequently, at flea markets and auctions. If you can only have one iron, pick a ¼” iron. This will be the iron you use most often; in my plow the ¼” iron is often used and rarely removed.
Like most hand tools, sharpness is vital. Sharpen the iron, with your favorite method, as sharp as you can make it. These often will not fit in a honing jig due to the extreme taper of the iron. Freehand honing is an important, and not difficult, skill to learn.
A clean plow is a happy plow
Most of the wooden plow planes you will find “in the wild” are about 100 years old. They have seen the insides of barns, garages and basements, not always protected by a tool chest. Like many wooden planes, some of them are downright funky. The best thing you can do for a plow is clean it up. The worst thing you can do is clean it up too much. The plows we will use are, and always have been, working tools. They have been used by many different sweaty, dirty hands. Getting the grime off the plane, but leaving the patina is the idea. Often, you can see patterns in the surface coloration, showing you where the past users put their hands when using the plane. You can tell how they used the plane, by the discoloration of the plow arms. You lose all of this information if you clean it too much.
My favorite method for cleaning is simply a good rubdown with a quality paste wax and a soft cloth. The solvent in the wax is usually sufficient to eliminate most of the grime and the wax leaves a nice tactile sheen on the wood. Never polish the brass too much; just do enough to get the grime off. No need to make these old guys shine like new. Too shiny, and you’ve ruined the look that it took 100 years to create. Remember, you can always remove more patina; you can’t really put it back on.
For the truly dirty planes, I’ll use Gojo, or similar orange oil based hand cleaner. The kind with pumice works the best, but you have to be very careful not to damage the wood. Wipe the plane down with a damp (not wet!) cloth, then take a small amount of Gojo and rub it around lightly with a rag. This should strip the dirt without going too far into the surface, if you are careful. Once you are satisfied, wipe the plane down again with a damp rag and apply the paste wax of your choice.
The plane should now be clean, have a square fence, a straight skate, a smooth depth stop and a properly fitting wedge and iron. It is now ready to adjust and use.
Plowing ahead
 |
| Ghost-planing the groove. |
Using your newly tuned plow should be a joy. This means proper stock selection. Unlike a bench plane, the front skate does very little to hold down the wood ahead of the iron. This means that the plow cuts like a plane with a very wide mouth; not a problem with cooperative wood but it can be rough if the wood wants to fight you. So choose your grooving stock carefully, orienting the grain to run with path of the groove. Set the plane to take a moderately heavy shaving, something between a try plane and a jack plane. You want to work quickly with thicker cuts, but not so heavy that you tear everything up. The wood will let you know how thick you can go.
Always mark out your groove with a marking gauge. You can use a mortising gauge and mark out both shoulders, or you can just mark one shoulder, relying on the cutting iron to cut the groove to the proper size. I tend to mark out both shoulders to avoid any potential chipping, and this helps me to ensure that my plane’s settings don’t slip in use. Either way, the point is to have a straight line, parallel with the reference edge, so that you can set your plow fence. These lines also make setting the fence to the proper width a simple matter.
To use the plow, place your off-hand, left for a right-hander, right for a left-hander, on the fence. This hand has only one job; to push the fence against the reference edge of the stock and keep it there. It should not be used to push the plane through the cut. This is the job of your main hand, right for a right-hander, left for a left-hander. This hand should not be used to keep the plane square to the work. Your two hands must never fight each other or try to do the job of the other hand; you will never cut a square groove if you allow this to happen. Trust the fence, trust the skate, and trust your eyes.
With a properly tuned plow, you can make grooves and rabbets quickly, lay out rip cuts efficiently, and do all of this work in a nice, quiet area, free from the scream of a universal motor and free from a spray of choking router chips.


