I use hand tools. I eschew the use of power tools at every turn, even for something as simple as drilling a pilot hole. I hate the dust. I hate the noise. I hate the danger. All of these things can be mitigated, of course, but I work wood to enjoy myself, not to be suited up like a diver on an extended deep sea expedition.
But I do what I do for a more profound reason than simple comfort. I do what I do because that is how it was done 250 years ago. In my hobby work (the things I make for me), I try to replicate 18th c. style pieces as closely as my skills allow. This means doing the work with the "proper" tools. I'm not judging power tools as "improper" in every case, but they are improper for the work I enjoy, where period accuracy is desired above all else.
18th. Century woodwork is full of what we would today term "flaws". Surfaces, even show surfaces, show tearout. Boards are thicknessed unevenly. Sometimes the marks from the saw pit or the tell-tale marks of riving are left untouched. Boards cup and tear out hinges because the original builder didn't take into account seasonal movement (at least to the extent we would consider necessary). Drawer runners get nailed on to case sides across the grain, what many would consider a major structural flaw.
It's more than just surface quality. Designing and building with hand tools, when properly done, yields a piece that looks handmade because of the overall composition of these "flaws" and design decisions based on the existing material specifications. You don't design a piece to an exact dimension, you make it work with the wood you have. You don't plane 7/8 down to 3/4, just because this is the dimension you see in the plan, you make 7/8 work.
This cannot be done with power tools, no matter if you have the latest Nurffurr 5000 variably-spaced dovetail jig. Those machine cut joints stand out like sore thumbs. So do router-made moldings. They are too perfect and look terrible on period work.
Since my goal is to make things look as much like the original as possible, I do not worry about the modern definition of "flaw". Sure, my surfaces sometimes show a little tearout, which usually goes away, visually, under shellac. My turnings are not identical and often show tool marks from my skew. My moldings show a little "movement" and are not identical from one foot to the next. My boards aren't perfectly flat (not hard to see why, my straightedge is Stick-of-Cherry, not Starrett). They are wavy, undulating, tactile, warm surfaces that show the pieces was made by hand, something that a machine cannot do. They are just flat enough to do what I need them to do. No more, no less.
That, my friends, is why I use hand tools. In no way should anything I ever say, anywhere, be taken to mean that I hate power tools, or that I somehow consider power tool work as less than hand tool work. It is just different. If my goal were different, I might very well put on the apron, safety glasses, hearing protection and fire up a Sawstop or a lunch-box planer.

We must end EEG now!
Prompted by a recent discussion on a woodworking forum, I must comment here on my dovetail philosophy. It is as follows:
Exposed dovetails are evil and must be eradicated.
The best furniture ever made, in my humble opinion, during any time period, was made in 18th century Philadelphia and Newport. The makers of these pieces, Affleck, Townsend, Goddard, all of them, took great pains to hide ugly dovetails behind moldings, veneer or with special mitered dovetails. There simply is no reason to expose dovetails on casework.
Some will argue that dovetails show craftsmanship. Baloney. Craftsmanship is shown in the overall execution of the piece, the molding work, the proportions, surface quality and, yes, joinery. But the dovetail is a simple mechanical joint. Honestly, it takes no great skill to execute adequately (sawing and chiseling to a line is fundamental, not extraordinary), and far, far, far too much attention is given to this one area of woodworking. And it isn't particularly beautiful. It is utilitarian.
The best way to improve your dovetails is to cover them with molding. This is as true of the finest, Klausz-like dovetails as it is for the average "hacked out with a screwdriver" looking dovetails.
We can eradicate the scourge of exposed end grain (EEG) in our lifetimes...
EDIT: Before I the lynch mob kicks down my door and cuts my Internet, please read this. This is tongue in cheek, a parody of many of the domineering opinions of so-called "experts" so prevalent in the woodworking media. I am not trying to change anyone's method of work; I am trying to expand the discussion beyond how to cut dovetails. Dovetails shmovetails, they don't make fine furniture any better.
Lost Art Press Woodworking Haiku Contest
Come on... all the cool kids are doing it.
Chris Schwarz is running a woodworking haiku contest on the Lost Art Press blog. If you win, you win a super-tuned #4 smoothing plane, as perfected by Chris himself.
For the less literary among us, a haiku is a short form of poetry from Japan. It utilizes 17 syllables, arranged in a 5 7 5 pattern. They are easy, and quite quick to write. Do not be afraid. Enter! The deadline is November 22 at noon.
My own entry:
Bench dogs are helpful...
But no matter how hard I tried, I just couldn't get this bench cat to perform any useful workholding task...


This little guy showed up at my house the other day. Very young, very skinny, no fleas thankfully. Asked the neighbors and nobody claimed him. I'd keep him but my cat Charlie won't have any of that.
Too bad, this little guy loves hanging out in my shop. Its unheated, or I'd just let him live in there. Oh well, somebody will take him and give him a good home. I hope they like being followed around and being distracted by the loudest purring cat in the history of the world.
Zach
So you want to learn how to use a sash fillister?
This question came up recently on one of the woodworking forums I frequent. I took a few photos demonstrating why you need a sash fillister for sash work. It doesn't see much work outside of that specialty, but it can come in handy for moldings.
Sash requires a glazing rabbet and a molding profile. The molding goes on the inside of the window, the part that faces the interior of the house. The rabbet is cut on the outside, so that the "ugly" putty and visual heaviness of the square edges goes outside the home. To achieve a good looking sash, it is important that all the moldings line up perfectly.
The glazing rabbets are not nearly as aesthetically important, so any potential error (always possible when working with hand planed stock) is thrown to the outside. The only practical way to achieve this is to only work from one face. Because of the importance of the molding, the reference face is always the inside face. All layout and joinery must be done from this side.
 |
| The glazing rabbet |
 |
| The molding (ovolo in this case) |
 |
| A good looking sash joint. |
 |
| The sash fillister references the front face to cut the glazing rabbet |
To cut the glazing rabbet, therefore, you need a sash fillister. This plane references the inside face, using the fence, and cuts with the inside left corner of the iron to cut the rabbet. It "leapfrogs" the area into which the molding is cut (rabbets are usually cut before the molding, this is just a demo piece that I had made before).
 |
| This is why a moving fillister doesn't work. |
A moving fillister can be used to cut the glazing rabbet, if you reference the "wrong" face and cut against the grain. As you might guess, the molding plane works best when planing with the grain, so the aesthetically important molding demands that the grain run in a friendly fashion for that cut. If you cut with a moving fillister from the back face, you run the wrong way and you risk tearing out. Admittedly, this isn't all that important, but it sure is easier work to plane the right way.
So, if you want to make sash by hand, you need a sash fillister. If you just want to buy a neat old plane, you need a sash fillister. If you want to power abrade your work into submission and set up your dado stack to cut your glazing rabbet, you probably don't need a sash fillister.
Outtake... hilarious photo
Guys,
I just had to share this picture. I'm building a special project for Popular Woodworking Magazine. Of course, part of the process of building and writing the article is shooting pictures while working. I swear, in real life, I'm not a giant...

My lovely wife April is the photographer for this build and she was shooting some photos of me while cutting a rabbet for the back boards of my piece. I don't know if its the angle, or the lighting, but I look like a giant hunched over my bench. I'm 6'5", my bench is 34" to the top but it looks like a step stool!
Anyway, this is the first project I've been working on in my new shop. It's mostly done, just need a door or two and some paint on the outside. It's a joy to work in a timber frame shop!
Zach
Stop asking 'what if" and just try it!
Friends,
The Internet, of course, is a wonderful tool, especially for a group as historically isolated as hand-tool furniture makers. In the old days, apprentices were expected to keep the secrets of the craft. In the more recent past, we've been the weird guys. We talk about citric acid rust removal for a molding plane iron rather than just buying a new router bit. We're the ones who would actually try to resharpen our own handsaws instead of just running down to the Borg for a new table saw blade. We like it when our projects actually look like they were made by a human, rather than having robot-like machined surfaces. An online community that reinforces that its ok to be beyond the Norm is a fantastic thing. But, as in all things, there is a dark side.
We also read far too many things that aren't particularly helpful. We see commentary about how flat your sole must be to make your plane work, despite many craftsman who don't worry about such trivialities. We hear that you can't cut dovetails without a razor-thin side bevel on your chisel, and to hell with Job Townsend. If you wouldn't ask a forum poster what size shirt you should wear, why would you ask them how high your workbench should be? Waterstones! No, diamond stones! No, oil stones!, No, Scary Sharp!
The echo chamber of internet woodworking forums is strong. Truths and non-truths reverberate with equal frequency and, unfortunately, the same validity. Escape! Think for yourself! Try things! Think about things! Make mistakes! Make discoveries!
If you want to be helpful, don't simply quote what Nicholson said, or Roubo, or Hayward, or Moxon, or Klausz. Anyone can read their words for themselves and adapt it to their work. What you can't get is the hands on experience of individual craftsman, unless those experienced people actually share their knowledge through posts. If you don't have experience with something, don't wait for someone else to figure it out for you. Try it! Write it up! Share! Advance the craft!
I have more respect for the man who tries, fails and shares that failure than the man who tries nothing yet knows all...
In the spirit of the American election season remember this; the average person will start to believe almost anything if they've been exposed to it at least seven times (I know this firsthand; I used to be a professional campaign manager). Now think about how many times you've heard how you must have those razor sharp bevels on a dovetail-chopping chisel. Have you actually tried to chop the waste with a firmer? I bet you'll find that you can do fine if you just tried it... and that's the point.
Zach
Tools for Working Wood has it nailed
I've always been pretty lucky in buying hardware. Quite often in my travels I find boxes of old cut nails, usually larger sizes, 8D and 10D, but occasionally in the smaller sizes more useful for furniture work. I also salvage nails from old barns when pulling them apart. So imagine my surprise when, the other day, I reached into my nail cabinet for a handful of 4Ds and came up empty. What the...???
So I panicked. "How am I going to finish this chest of drawers," I asked myself. "Surely, I can't use wire nails, that would destroy the look of the piece!". Fortunately, I remembered Joel Moskowitz and the brilliant folks over at Tools For Working Wood.
I ordered a pound of 4D Fine Finish Nails, a 1/2 pound 2D and 1/2 pound 4D Decorative Wrought Head Cut Nails, and 1/8 pound of 2D Headless Cut Brads. They arrived quicker than I expected and are of excellent quality. And they come in neat paper bags.
The Decorative Wrought Head nails are for some carved boxes, a la Peter Follansbee, that I'm making for Tillers International. More on that later.
And the other nails are for finishing my chest over drawers, and for a very special project that I'm writing up for Popular Woodworking. Much, much more on that later as well.
As for my nail cabinet? Of course, I completely forgot that I had just bought a box of vintage (read as "rusty") 4D finish nails at an antique mall in Madison, WI. I found them two days after my TFWW order arrived. So, I should be set for a while, at least until I forget and order more... Joel, you have my credit card number and address. Don't let me run out!
Zach
So I panicked. "How am I going to finish this chest of drawers," I asked myself. "Surely, I can't use wire nails, that would destroy the look of the piece!". Fortunately, I remembered Joel Moskowitz and the brilliant folks over at Tools For Working Wood.
I ordered a pound of 4D Fine Finish Nails, a 1/2 pound 2D and 1/2 pound 4D Decorative Wrought Head Cut Nails, and 1/8 pound of 2D Headless Cut Brads. They arrived quicker than I expected and are of excellent quality. And they come in neat paper bags.
 |
| Cut nails. Image from TFWW website |
 |
| Wrought Head nails. Image from TFWW website. |
 |
| Headless brads, for moldings. Image for TFWW website |
And the other nails are for finishing my chest over drawers, and for a very special project that I'm writing up for Popular Woodworking. Much, much more on that later as well.
As for my nail cabinet? Of course, I completely forgot that I had just bought a box of vintage (read as "rusty") 4D finish nails at an antique mall in Madison, WI. I found them two days after my TFWW order arrived. So, I should be set for a while, at least until I forget and order more... Joel, you have my credit card number and address. Don't let me run out!
Zach
A perfect storm...
So its been a while since I posted, as I was so gently reminded by readers Jorge and Andrew at the MWTCA meet on Saturday. I know... I know... I'll give the same excuse I give my wife when something isn't done. It's on my list, and I'll get to it as soon as I can.
For you see, my List is quite long at the moment. I'm still trying to finish my barn. "Wow, that really escalated quickly. I mean, that really got out of hand fast". Finishing the floor hopefully this week and then I can start to move a few things in, so that I can finish the custom doors. I'm sick of carpentry and I want to get back to cabinetmaking asap.
I've decided to build a William and Mary spice cabinet. You may remember that I lust for a William and Mary high chest, specifically the 1726 made example that lives in the Philadelphia Museum of Art. So this will be a small scale version, one might say a Study in Walnut... it will be based on this piece that recently sold at auction for $112,000.


I've just added to my collection of Gabriel planes, buying 26 out of an original set of 36 hollows and rounds. And I've just succeeded in adding to my collection of infills, scoring a nice user made smoother at the MWTCA meet over the weekend. Pics are forthcoming.
Hopefully things slow back down after the shop is finished. We've been on the go for so long that it almost feels normal. Gotta get back to the things I enjoy the most.
Zach
Great book on barns and timber framing
While reading up on barn raising project, I came across a fascinating book called Silent Spaces. This book details a number of incredibly beautiful timber frame aisle barns from all over the world. In addition to many detailed photographs, the writing is superbly interesting. If you have any interest at all in timber framing, barns or the history of architecture (this book goes back to the Romans!), find this book. It is out of print, but Amazon has a few used copies here (I bought mine from Amazon), and other sellers will have it as well.
Buy this book. Like me, you will not be disappointed. I like it so much that it has inspired my next run of custom furniture. I do a lot of speculative work, hoping someone will like it enough to buy it, and I've got a few great ideas kicking around because of this book, including one for an upcoming well-known furniture show in the Boston area....
Until next time,
Zach
 |
Until next time,
Zach
Barn Raising, 130hp at a time.
The bents are up! The bents are up!
We used my father in law's 130hp International with bulldozer blade to raise the bents. I figured we'd need about 10 people to raise it by hand, or 3 and a tractor. Well, guess what, a tractor won't sue you if a beam falls on it, so we went with the tractor. No injuries were reported, no accidents to speak of. An excellent day.
 |
| I love the smell of old timbers in the early evening. Note my shave horse in the lower left |
 |
| Go Go Gadget International. My father-in-law should win the Gold in the Tractor Olympics. |
Of course, I would have loved to have a traditional barn raising, bringing neighbors and friends over for a great big feast. But we don't have a new stove yet, and a couple of gallons of diesel is a far more affordable meal for the lifting crew....
 |
| My ugly mug on the frame. Thanks April! |
My new shop :)
As many of you know, my wife and I are moving back to the country. Just today, I bought a 12 x 16 timber frame barn that will serve as the base for my new shop (the 1900 farmhouse doesn't have a shop space for me at the moment). The building was delivered and I spent the morning sorting the pieces and powerwashing them to prepare for the raising. Clearly, I will be taking lots of pictures, but here are a few...


Plane making fool
Here is a beech miter plane that I started on Monday and finished last night. It is bedded at 32 degrees, bevel down, so I'll have to be careful with clearance angles for the blade. It has a cherry wedge and a pink ivory strike block. I enjoy the look of the pink ivory so much that I think this will become my signature, using pink ivory in some way on every plane I make from here on out.


If you are at all interested in making planes, I encourage you to give it a go. Nothing is more satsifying than using a fine tool that you've made yourself, in your own shop, with your own hands.


I used a piece of beech that had some sapwood in it, as it was necessary to get the full size I needed with proper quarter sawn grain and with the grain running in the right direction. The patch in the mouth was my attempt to make up for the relative softness of the sapwood beech. My cruddy photo skills cast some shadows on the mouth, making the gauge lines look huge and deep. They are not this way in person. It works phenomenally well!
I'm not usually a fan of shiny wood planes, but this and my plow are extremely shiny and they look incredible, at least to my eyes.
If you are at all interested in making planes, I encourage you to give it a go. Nothing is more satsifying than using a fine tool that you've made yourself, in your own shop, with your own hands.
Zach
Made a plow plane
A while back I got an early plow plane. It exhibits some characteristics of 18th century English plows, but it was unusable. I wanted to be able to use that style of plow. So I made one to fit my full set of Ohio Tool plow irons.
I started with some air-dried walnut that I got from a local farmer. He sells through one of the antique malls. Split out the body (easier than sawing) and planed it flat and square. I copied the layout from the example plow and drew it on the body. A few minutes with a 1/2" center bit, a 3/8" shell bit and some chisels got me here:

After finishing off the body, I worked on the fence. I don't have any
pics in progress, but here is a shot of the arms and the still-square
fence in place on the body.


I then molded the fence, copying the model. The ovolo was carved with a paring gouge and then smoothed with a round plane. The rabbets were cut with my Huntsman Late Moon fillister plane and smoothed with my LN shoulder plane.
I then started on the skate. I didn't have any steel of the proper width, but I did have some nice copper plate. One of my favorite things about woodworking is using non-traditional materials in traditional projects. So I used it to make the skate and the washers for the arm rivets. The skate was riveted in place using standard
rivets into the countersunk copper plate. The heads were then filed flush and smooth with the plate. I left the rivet heads on the non-skate side, again copying the way the original was done. Here is a shot after the finish was applied.


The wedge was fit after the skate was in place, copying the finial from the existing plow.
My finish was 8 coats of linseed oil followed by 6 coats of blonde shellac. This was rubbed out with amber paste wax, but I didn't use steel wool as I wanted the shine to stay high. Here is a shot of the plane in use. It works great!

I started this plane on Feb. 18th and rubbed out the final finish this afternoon. So, 8 days start to finish. Total time is about 25 hours. I've never been much of a toolmaker, but this will definitely not be my last plow. I picked up a copy of Rosebrook's Wooden Plow book at an antique store today, and I'm thinking about working my way through it. Now I just need to find enough irons to make it worth my while!
The (not-so) True Story of The Nib.
Everyone knows that woodworkers are slow to complete projects. This is a huge problem when you are working for a living, especially when you are working for someone else, and even more so when you have a date with a lusty serving wench at the local tavern. So, a mid-17th century Dutch-German carpenter, I.M Van Der Fulypunktual, decided that he needed a better way to tell how long he had been at work.
Now, back then, clocks were extremely expensive. All the gears were hand-filed from extremely pricey materials. I.M didn't have enough cash to buy a real clock AND pay for his bier, so he solved the problem in an ingenious manner. He built a portable sundial and riveted in right on the end of his favorite saw. This was perfect for him. He could saw his heart out and know exactly what time it was. But far more importantly, he knew exactly when quitting time was, and when bier-o'clock came around on that sundial, he could quit right away.
Now, the other carpenters in the area were frustrated that I.M. got the best table, the freshest pour and the freshest serving girls at the tavern, so they soon replicated his successful design on their own saws. Soon the entire guild of carpenters were seen as do-nothing drunkards, all thanks to that sundial, which lives on today in the form of the saw nib. Need proof? Just offer a carpenter a cold one...
My Review of Dan?s Whetstone Block-Mounted Hard Select Arkansas Sharpening Stone - 6"
This stone is $7.95. While a little small for plane irons (it will work, just takes some effort), its great for knives and chisels. Enjoy!
High quality stone at a great price.
By The Eaton County Woodworker from Charlotte, MI on 2/6/2012
Pros: Premounted to save time, Wipes clean easily, Cuts fastCons: No cover for stone, Too small for plane irons
Best Uses: Small woodworking tools, Chisels, Knives
I use this stone to sharpen my woodworking tools. Plane irons can be sharpened, but its a challenge, given the small size. Chisels are fine. I wish this stone had a full wooden box, not just a premounted base.
(legalese)
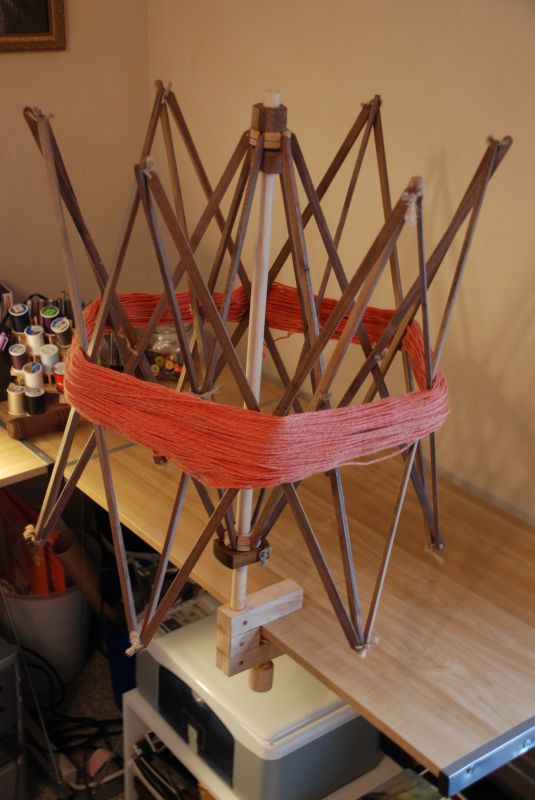
Tools for the knitter
Making tools is always a fun diversion from other shop projects, like things for your wife. Making a tool you've never made before always teaches you a new skill. But making a tool you've never made before for your wife... now you're on to something!
My wife is a talented knitter. She collects yarn like I collect wood; you can never have enough of either! Sometimes she buys yarn that has been locally spun and dyed, then wound into skeins (around another cool tool called a niddy-noddy). A loose skein is of little use to her, so she needed a way to easily make loose skeins into a yarn ball. Enter the woodworker...
This is called an umbrella swift. The bows are made of 1/4" thick walnut; the central pike and hubs are birch. The attaching jaw is hard maple, with an oak screw. The bottom hub slides up and down to adjust the diameter of the swift, to accomodate skeins of different lengths, as well as to allow the skein to close down for storage.

All the joints are tied with hemp cord, except where the bows attach to the hubs. This was done with fine gauge wire for durability and ease of attachment. The bottom hub rides on a fence, which tightens with a thumbscrew to lock in the setting.
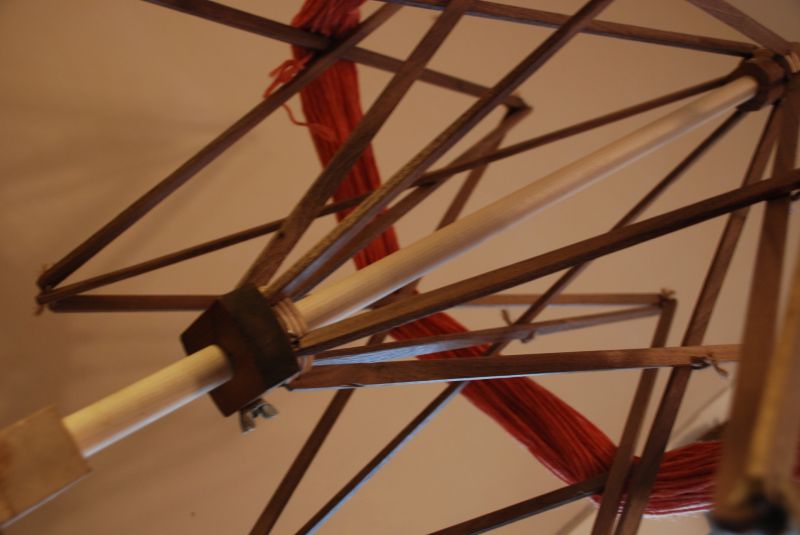
In action, the swift bows and hubs rotate around that central pike, providing a convenient way to control a loose skein while it is wound into a ball. To use the swift, you also need a nostiprinne.

This is essentially a stick around which a ball of yarn is created. There are crank machines available that do this, but they are almost all made of cheap Chinese plastic, so no thank you. This takes a little longer to create a ball of yarn but it was made by me, on my spring pole lathe, from locally harvested wood.
Zach
My wife is a talented knitter. She collects yarn like I collect wood; you can never have enough of either! Sometimes she buys yarn that has been locally spun and dyed, then wound into skeins (around another cool tool called a niddy-noddy). A loose skein is of little use to her, so she needed a way to easily make loose skeins into a yarn ball. Enter the woodworker...
 |
All the joints are tied with hemp cord, except where the bows attach to the hubs. This was done with fine gauge wire for durability and ease of attachment. The bottom hub rides on a fence, which tightens with a thumbscrew to lock in the setting.
In action, the swift bows and hubs rotate around that central pike, providing a convenient way to control a loose skein while it is wound into a ball. To use the swift, you also need a nostiprinne.
This is essentially a stick around which a ball of yarn is created. There are crank machines available that do this, but they are almost all made of cheap Chinese plastic, so no thank you. This takes a little longer to create a ball of yarn but it was made by me, on my spring pole lathe, from locally harvested wood.
Zach
Rules for Sucessful Woodworker Interactions
I'm not one for philosophy. I can't sit for hours and contemplate the meaning of life, nor do I weep at the sight of a bud in spring. I do, however, get a little frustrated when people repeat, ad nauseum, old arguments as to why one way of working wood is better than another. While I may have a bias (my Mathieson can beat up your Delta!), I'm not against any woodworker, Normite or Galoot.
It is unfortunate that it has come to this, but here are my rules for dealing with other woodworkers, especially all you power tool guys:
1) Know Thyself! There is no merit badge for woodworking dogma. If you like hand tools use them. If you don't, don't. If you don't know what you like, try them out (the whole goal of everything I've ever written)
2) Just Do Something! The only "bad" woodworking is the woodworking that doesn't get done, or that which is done without enjoyment, regardless of methodology.
3) Think for Yourself! The echo chamber of the Internet makes it harder for guys to try things for themselves and make their own decisions about what tools they need or would like to try.
4) Stop trying to beat the 18th Century! Woodworking knowledge and technology peaked sometime in the 18th century (Slightly kidding!).
Michigan's Monticello?
Given that it is far too cold to paint my chest on drawers at the moment, I'm sort of stuck with that particular project (should have been done several months ago, admittedly, but the tennis court has been calling me back). In the time since my last post, I put together a large knitter's swift for my very talented wife, as well as a quick turned yarn ball winding stick (is there a better name for this tool?). Pics to come soon.
As a New Years Resolution, I've decided to maximize my personal shop time by focusing on a series of projects with the same theme. Given that my wife and I will be moving to a much larger country farmhouse sometime in June, one that will feature a grand library, I need to create some appropriate furniture for that setting. I've decided to reproduce as many things associated with Thomas Jefferson and Monticello as I can. Right now the list (in no particular order) is:
- 5 sided book stand (nearly complete)
- Jefferson's lap desk (have the plans)
- Tall clock (working from the pics in the Monticello guidebook)
- Campechey chair (mine will be in locally harvested cherry, not mahogany, but I have the plans)
- Bookcases, as featured in the June 2011 issue of Popular Woodworking
Two more things that I want to make, but not associated with Jefferson are;
- Pennsylvania spice box (to hold small artifacts in the library)
- Joint stool (getting the Peter Follansbee book buzz already)
After I complete the book stand, the Campechey chair will be next up. I purchased the plans from Tim Killen, via his website. I've been wanting to build the Campechey chair for a while, but the curves confounded my efforts to scale up from pictures. Tim's plans feature a full size template page, that you can print at Kinkos and then glue down to make a pattern for each piece.
I'm really looking forward to building this, as I've been wanting to make one ever since I saw the original in the parlor at Monticello. My goal is to have it completed before April 28th, as this is the date of the next SAPFM Great Lakes Chapter meeting, where I will be demonstrating how to make sash for period furniture and homes. What a show and tell piece that would be to have the Campeche chair done!
This is a very ambitious schedule, one that I'm not sure I can keep, but I'm going to give it my best shot. My resolution, along with focus, is to finish more personal projects in a more reasonable time frame. No more half-done projects waiting for me to find a roundtoit... that is, at least, when it isn't too cold to paint!
Zach
Subscribe to:
Posts (Atom)
Teeth cut swiftly through the pine
Blast! Its still too short!